
How to Repot an Orchid: A Step-by-Step Guide for Healthy Plants
If you want to keep your orchid healthy, thriving, and blooming beautifully, learning how to repot an orchid is an essential part of orchid care. While orchids may seem delicate, repotting them is actually a simple process once you understand what the plant needs. In fact, regular repotting can make a major difference in the health of your orchid’s roots, leaves, and future flowers.
Many orchid owners are unsure about how to repot orchids without causing stress to the plant. Others wonder whether repotting an orchid is really necessary at all. The truth is that orchids do not grow in regular potting soil like many houseplants. Most orchids are potted in bark, moss, or other loose materials that allow air to circulate around the roots. Over time, that material breaks down, holds too much moisture, and creates poor growing conditions. That is why repotting orchids every so often is so important.
Whether you are figuring out how to transplant an orchid, searching for tips on how to replant an orchid, or simply wondering, how do I repot my orchid, the good news is that the process is very manageable with the right guidance. Once you know when to repot, what materials to use, and how to handle the roots carefully, you can help your orchid continue to grow strong and produce gorgeous blooms.
In this guide, we’ll walk through everything you need to know about orchid repotting, including when to repot, the supplies you’ll need, and the step-by-step process for success.
Why Repotting Orchids Is Important
Repotting is a critical part of proper orchid care. Unlike many houseplants that grow in soil, most orchids grow in loose, airy materials like bark or sphagnum moss that allow their roots to breathe. Because of this unique growing environment, repotting orchids is necessary to maintain healthy root systems and long-term plant health.
Over time, orchid potting media naturally begins to break down. As bark chips and moss decompose, they become more compact and start holding too much moisture. This can limit airflow around the roots and create the perfect conditions for root rot, which is one of the most common problems orchid growers face. Regular orchid repotting helps prevent this by refreshing the potting mix and restoring the proper balance of air and moisture around the roots.
Another reason repotting an orchid is important is root growth. Healthy orchids produce strong root systems that eventually outgrow their containers. When roots become crowded or start pushing out of the pot, the plant may struggle to absorb enough water and nutrients. Learning how to repot orchids allows you to give the plant more room to grow while keeping the roots properly supported.
Repotting also gives you the opportunity to inspect your orchid’s roots and overall health. During the process, you can remove dead or damaged roots, clear away old media, and reset the plant in fresh material that encourages healthy growth. This type of maintenance is especially beneficial for popular varieties like Phalaenopsis orchids, which thrive when their roots have plenty of airflow.
When done properly, the repotting of orchids helps plants grow stronger, produce healthier leaves, and develop more impressive blooms in future flowering cycles. It’s a simple step that plays a big role in keeping your orchid thriving for years to come.
Signs Your Orchid Needs Repotting
Not sure whether it’s time to repot your plant? Many orchid owners wonder how to repot an orchid but don’t realize their plant has already been showing signs that it needs fresh potting media or a larger container.
Fortunately, orchids are fairly good at signaling when they’re ready for repotting. Watching for these signs can help you determine when repotting orchids will benefit your plant the most.
Roots Are Growing Out of the Pot
One of the most obvious signs is when roots start growing over the edges of the container or pushing out through drainage holes. This usually means the orchid has outgrown its pot and needs more space.
While a few aerial roots are normal, excessive root growth outside the pot often indicates that repotting an orchid is necessary.
The Potting Mix Is Breaking Down
Orchids are typically planted in bark, moss, or a specialized orchid mix. Over time, these materials naturally decompose.
If the potting media looks dark, compact, or soil-like instead of light and chunky, it’s a strong sign that orchid repotting is overdue. Decomposed media holds too much moisture and reduces airflow to the roots.
Water Is Not Draining Properly
Healthy orchid media allows water to flow freely through the pot. If you notice that water sits on top of the mix or drains very slowly, the potting material has likely broken down.
When this happens, repotting orchids in fresh media will restore proper drainage and improve root health.
Roots Look Unhealthy
When you remove an orchid from its pot, healthy roots should appear firm and either green or silvery white.
If you see roots that are:
brown
mushy
hollow
or dried out
it may be time for repotting of orchids so damaged roots can be trimmed and the plant can be placed in fresh growing media.
The Plant Is Becoming Unstable
If your orchid feels loose, top-heavy, or wobbly in its pot, it may have outgrown its container or lost structural support from decomposing media.
Learning how to replant an orchid properly will help stabilize the plant and encourage stronger root development.
It’s Been More Than Two Years
Even if your orchid looks healthy, many growers recommend repotting orchids every one to two years. Regular repotting refreshes the growing medium and keeps the root environment healthy.
For many home growers wondering how to transplant an orchid successfully, simply keeping track of this timeframe can make orchid care much easier.
When Is the Best Time to Repot Orchids?
Timing plays an important role when repotting orchids. While it’s possible to repot an orchid at almost any time if the plant is struggling, choosing the right moment helps minimize stress and encourages faster root recovery.
In most cases, the best time to repot orchids is right after the plant finishes blooming. At this stage, the orchid is entering a new growth cycle and will soon begin producing fresh roots. Repotting during this period allows those new roots to grow directly into the fresh potting mix, helping the plant establish itself more quickly.
For many common household orchids—especially Phalaenopsis varieties—new root growth typically begins shortly after the flowers fade. This makes the post-bloom period an ideal window for repotting.
Repot During Active Root Growth
If possible, try to repot your orchid when you see new root tips forming. These roots are usually bright green and actively growing. When orchids are repotted during this stage, they tend to adapt to their new container and potting mix much more easily.
Repotting during active growth also reduces the chance of the plant experiencing transplant shock.
Avoid Repotting During Full Bloom
Although it may be tempting to repot your orchid while it’s in flower, it’s generally best to wait until blooming has finished. Repotting during the flowering stage can cause the plant to redirect energy away from the blooms and toward recovering its roots.
In some cases, this may cause flowers or buds to drop early.
Exceptions When Immediate Repotting Is Needed
There are situations where you shouldn’t wait to repot an orchid. Immediate repotting may be necessary if:
The potting mix has completely broken down
The roots show signs of rot
The plant has pests or disease
The orchid is severely overcrowded in its pot
In these cases, repotting sooner can help prevent further damage and improve the plant’s chances of recovery.
Understanding the right timing makes the process of repotting orchids much easier and helps ensure your plant continues growing strong.
What You’ll Need to Repot an Orchid
Before you begin repotting an orchid, it’s helpful to gather the right materials. Using proper tools and potting media makes the process smoother and helps ensure the plant stays healthy during the transition.
Fortunately, repotting orchids doesn’t require many supplies. With just a few basic items, you can successfully refresh your orchid’s growing environment and support healthy root development.
Fresh Orchid Potting Mix
One of the most important supplies is fresh orchid potting media. Unlike most houseplants, orchids should not be planted in standard potting soil. Their roots need plenty of airflow, which is why orchid mixes are typically made from materials like bark, sphagnum moss, coconut husk, or perlite.
These materials allow water to drain quickly while still holding enough moisture for the roots. Replacing old media with fresh mix is one of the main goals when repotting orchids.
A Pot with Good Drainage
Choosing the right container is also important. Orchids do best in pots that provide excellent drainage and airflow.
Many growers use plastic orchid pots with multiple drainage holes or slotted sides that allow air to reach the roots. In most cases, the new pot should only be slightly larger than the previous one. We suggest that the new post be only one inch larger. For example, if the original pot was a three-inch pot, the new pot should be four inches. Orchids generally prefer a snug fit rather than a large container.
Sterilized Scissors or Pruning Shears
When repotting an orchid, you’ll likely need to trim away any dead or damaged roots. Clean, sharp scissors or pruning shears make this process easier and help prevent damage to healthy roots.
It’s always a good idea to sterilize your tools beforehand to avoid spreading bacteria or disease to the plant.
Gloves (Optional)
Some growers prefer to wear gloves while handling orchid roots and potting media. This step is optional, but gloves can help keep your hands clean and provide extra grip when working with bark or moss.
A Clean Workspace
Finally, prepare a clean surface where you can comfortably work with your orchid. Repotting can be a little messy since you’ll be removing old potting mix and handling loose media.
Laying down newspaper, a tray, or a gardening mat can make cleanup easier.
With these supplies ready, you’ll be well prepared for the next step: learning exactly how to repot orchids using a simple, step-by-step process.

How to Repot an Orchid (Step-by-Step)
Once you’ve gathered your supplies, the process of repotting an orchid is fairly straightforward. The goal is to remove old potting media, check the health of the roots, and place the plant into fresh material that allows for good airflow and drainage.
Following a careful step-by-step approach helps reduce stress on the plant and encourages healthy new root growth.
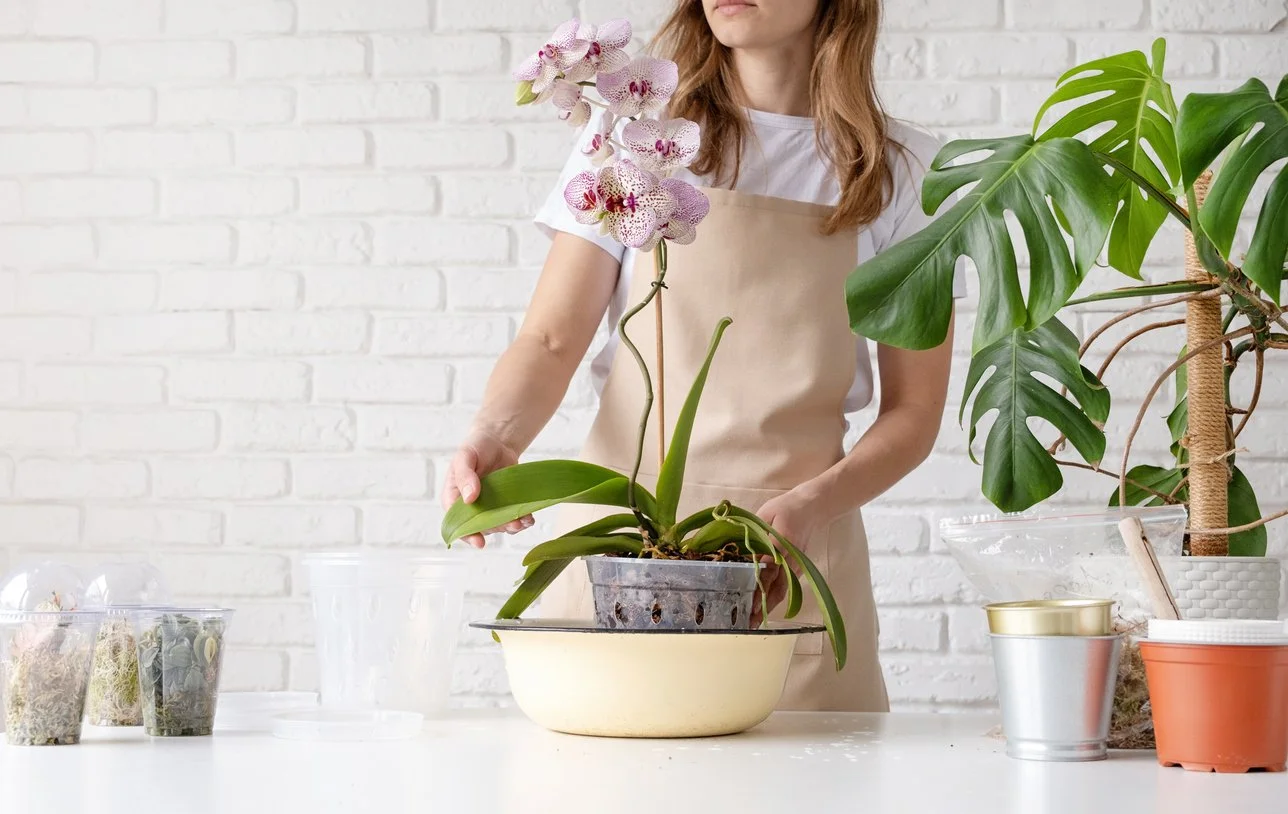
1. Gently Remove the Orchid from Its Pot
Start by carefully taking the orchid out of its current container. If the pot is plastic, you can gently squeeze the sides to loosen the root system. For orchids that are stuck, slowly wiggle the plant or tip the pot upside down while supporting the base of the plant.
Take your time during this step, as orchid roots can cling tightly to the inside of the pot.
2. Remove the Old Potting Media
Once the orchid is out of the pot, begin removing the old bark or moss from the roots. You can gently tease the material away with your fingers.
If the media is stubborn or compacted, rinsing the roots under lukewarm water can help wash away remaining pieces. Removing as much of the old mix as possible allows the plant to fully benefit from fresh potting material.
3. Inspect and Trim the Roots
After cleaning away the old media, take a moment to examine the root system.
Healthy orchid roots are typically firm and appear green or silvery white. Damaged roots may look brown, mushy, hollow, or dry.
Using sterilized scissors or pruning shears, carefully trim away any unhealthy roots. Removing damaged roots helps prevent rot from spreading and encourages the plant to produce new, healthy growth.
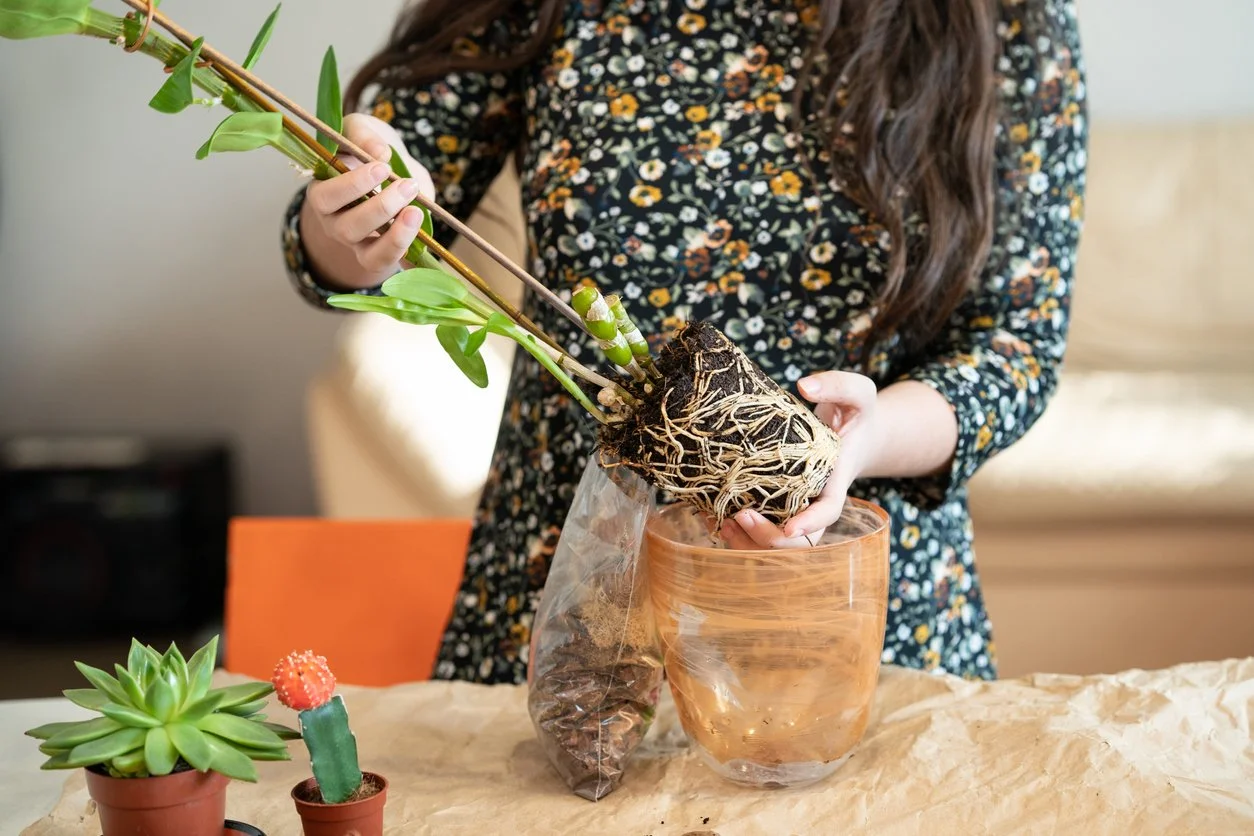
4. Position the Orchid in Its New Pot
Add a small layer of fresh orchid mix to the bottom of the new pot. Place the orchid in the container so that the base of the plant sits just below the rim of the pot.
Hold the orchid steady while gently spreading the roots into the container.
5. Fill in with Fresh Potting Mix
Gradually add the orchid potting mix around the roots. Lightly tap the sides of the pot as you fill it to help the media settle evenly around the root system.
Avoid packing the mix too tightly. Orchids need air circulation around their roots, so the media should remain loose and well-aerated.
6. Allow the Plant Time to Adjust
After repotting, place the orchid back in its usual growing environment with bright, indirect light. Many growers wait several days before watering to allow any trimmed roots time to heal.
Within a few weeks, the orchid should begin settling into its new potting mix and continue developing healthy roots.
Aftercare Tips for Newly Repotted Orchids
Once you’ve finished repotting an orchid, proper aftercare helps the plant adjust to its new environment and encourages healthy root development. Orchids can experience a small amount of stress after repotting, but with the right conditions they typically recover quickly and continue growing normally.
Wait Before Watering
One of the most important aftercare steps is holding off on watering right away. Many orchid growers recommend waiting about 5 to 7 days before watering a newly repotted orchid.
During the repotting process, some roots may have been trimmed or slightly damaged. Allowing a few days before watering gives those roots time to heal and reduces the risk of rot.
Provide Bright, Indirect Light
Place the orchid back in a location where it receives bright, indirect sunlight. Orchids generally thrive in well-lit areas, but direct sunlight immediately after repotting can add unnecessary stress to the plant.
A spot near an east-facing window or a bright room with filtered light works well.
Avoid Fertilizing Right Away
After repotting, it’s best to give the orchid time to settle into its new potting mix before introducing fertilizer. Waiting two to three weeks allows the roots to re-establish and begin growing into the fresh media.
Once the orchid resumes normal growth, you can gradually return to your regular fertilizing routine.
Maintain Proper Humidity
Most orchids appreciate moderate humidity levels. Keeping humidity between 40% and 60% can help support recovery after repotting.
If your home is particularly dry, placing the orchid near a humidity tray or using a small humidifier can help create a more comfortable environment for the plant.
Monitor the Roots and Potting Mix
Over the next few weeks, keep an eye on the orchid’s roots and potting media. Healthy roots should remain firm and gradually begin growing into the fresh mix.
It’s normal for the plant to take a little time to fully settle in. With proper care, your orchid should soon resume normal growth and continue developing strong roots and future blooms.
Common Mistakes When Repotting Orchids
Repotting orchids is a fairly simple process, but a few common mistakes can make it harder for the plant to recover and thrive. Understanding what to avoid can help ensure your orchid stays healthy and continues producing beautiful blooms.
Using Regular Potting Soil
One of the most common mistakes is planting orchids in traditional potting soil. Unlike most houseplants, orchids need excellent airflow around their roots. Standard soil retains too much moisture and can quickly lead to root rot.
Instead, always use a specialized orchid potting mix made from materials like bark, moss, coconut husk, or perlite. These ingredients allow water to drain properly while still providing enough moisture for healthy root growth.
Choosing a Pot That Is Too Large
It may seem helpful to move an orchid into a much larger container, but orchids generally prefer a snug growing environment. A pot that is too large can hold excess moisture and make it harder for the roots to dry out between waterings.
When repotting an orchid, it’s usually best to choose a pot that is only slightly larger than the previous one. Again, we suggest that the new pot only be one inch larger than the original.
Packing the Potting Mix Too Tightly
Orchid roots need air circulation to stay healthy. Packing the potting mix too tightly around the roots can limit airflow and create overly damp conditions.
When adding fresh media, gently fill the pot and allow the mix to settle naturally rather than pressing it down firmly.
Repotting Too Frequently
While repotting is important, doing it too often can stress the plant. Most orchids only need to be repotted about every one to two years, or when the potting media has clearly begun to break down.
Frequent repotting can disturb the root system and slow down growth.
Damaging Healthy Roots
Orchid roots can be delicate, especially when they attach themselves to the pot or surrounding media. Pulling the plant out too forcefully or cutting healthy roots can weaken the orchid.
During repotting, handle the roots carefully and only trim roots that are clearly dead or damaged.
Conclusion
Learning how to repot an orchid is an important skill that can help your plant stay healthy and continue producing beautiful blooms year after year. By refreshing the potting media, trimming damaged roots, and giving the plant a stable growing environment, repotting supports stronger root systems and better overall growth.
While the process may seem intimidating at first, repotting orchids becomes much easier with practice. Paying attention to signs that your orchid needs fresh media, choosing the right time to repot, and following a careful step-by-step approach can make a big difference in the long-term health of your plant.
With the right care and occasional repotting, orchids can thrive for many years indoors. Healthy roots, proper airflow, and fresh growing media all play an important role in helping these plants flourish.
For those who love decorating with orchids or incorporating them into events, working with high-quality plants can make all the difference. Growers like Westerlay Orchids provide beautiful, professionally cultivated orchids, and floral professionals often source bulk arrangements through Box of Orchids for weddings, events, and installations.
With a little care and the right techniques, repotting orchids can become a simple and rewarding part of maintaining these elegant plants.